Not only is it possible to access DR data across SQL servers, but it’s also possible to combine data from different sources in the same query. If there is such a thing as the holy grail of DR reporting, this may be it. Not only is it possible to access data across SQL servers, but it’s also possible to combine data from different sources in the same query. Normally this is straightforward, but the DR adds an extra challenge because of an atypical server-wide setting: the server collation.
Collation? What’s that?
In simple terms, collation controls the way strings are stored and compared within the database. The collation is defined at the server level and there are several possible settings available for MS SQL Server. These include everything from basic binary to many common European languages that can require special characters and syntax settings. In the US, the most common collation setting (and the default specified by Microsoft) is Latin General Case Insensitive. Almost all SQL servers and databases use this setting, so for most SQL writers, not worrying about case sensitivity in database object names and query values is the norm. To express this simply: a = A.
When MEDITECH designed the Data Repository they used the collation setting of Latin General Case Sensitive. With this setting, upper and lower-case characters are distinctly different (a <> A). Being such a large warehouse with constant write activity, this made sense because the server will have slightly better performance since it doesn’t have to compare upper/lower case all the time. The drawback now is that we must construct our queries by paying attention to upper and lower-case characters. MEDITECH doesn’t officially support or recommend installing third-party SQL databases on your DR server because of the atypical collation setting. And while you can override the default server collation setting for an individual database, it complicates how we join data across these databases.
Linking the servers
Let’s say you have an application running on a separate SQL Server with the standard, case-insensitive collation installed. The first step to enable querying across servers (sometimes referred to as either a “heterogeneous” or “distributed” query), is to set up a Linked Server using Management Studio on the host system (the system where your query or stored procedure will be executed). The Linked Server defines a connection between two systems, including the credentials used to establish the connection.
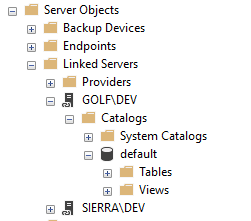
The easiest way to set up a Linked Server is using Management Studio; you can find this under: Server Objects -> Linked Servers -> (right click) New Linked Server. (Keep in mind only server administrators can create this link). Select “SQL Server” as the Server type and enter the name of the SQL Server you want to connect to. (And yes, you can make connections to any OLE-DB database here which gets scary cool!) Use the Security options to define the proper credentials this link will be using. This approach is flexible, allowing you to use your own credentials on the target system, or impersonate a different set of credentials, if it’s valid on the other system. Depending on your security strategy, general users may or may not have access to what you’re pointing to so be mindful of how you set this up and make sure you understand the security settings you’re using! Remember to follow the principle of allowing the minimum necessary access – ideally, using credentials on the target system that only permit read access to data.
Once the link is successfully set up, you should be able to browse through to your new linked server by expanding the “Catalogs” folder. Or from your host system (the non-DR server), you can even try a query using the following syntax:
SELECT TOP 100 * FROM <MY_DR_SERVER>.livedb.dbo.AbstractData
Note that you must use the fully qualified table name, which includes the DR server name as well.
Bringing the data together
The real benefit to querying data across servers is that it allows you to bring information together from multiple sources and present it to your report users seamlessly. It doesn’t matter to them which system the data came from, they just need to see it and be sure it’s accurate. Once the Linked Server is established, we can now include data from the target system by simply joining to it, like you would any other table in a database. We do need to include the linked server reference however, as well as some additional syntax to accommodate the different collation types on the servers, as we’ll see below.
Here’s a simple example based on our hypothetical “standard” collation SQL Server as a starting point.
Our third-party system has a few extra fields we want to include with DR data from MEDITECH. Let’s say our system has an ADT interface to MEDITECH, so we can use the native MEDITECH account number to identify the visit and correctly associate the records from the two systems. Our non-MEDITECH application stores the information in a table called PatientVisits, but we want to append some information from the MEDITECH AbstractData table in the DR. We’ll run the following query on our non-DR server, and join to DR using the AccountNumber like this:
SELECT
PatientVisits.VNumber,
AD.AdmitDateTime,
AD.Name,
AD.PtStatus,
PatientVisits.Notes,
PatientVisits.Whatever
FROM PatientVisits PV
LEFT JOIN MY_DR_SERVER.livedb.dbo.AbstractData AD
ON PV.VNumber = AD.AccountNumber COLLATE SQL_Latin1_General_CP1_CI_AS
The key to the syntax here is adding the “COLLATE SQL_Latin1_General_CP1_CI_AS” immediately after the field that we’re joining on. This tells the query engine to format this field to match the server collation setting of our PatientVisits table. If you were running the query FROM the DR server, you would use: COLLATE SQL_Latin1_General_CP1_CS_AS.
Treat yourself to something from the vending machine if you get this to work. I don’t have to expand very much on the potential of what you can do with this. With so many third-party applications using Microsoft SQL Server, this technique becomes a powerful tool for reporting across all of your SQL data sources. This also saves you from having to replicate tables or trying to synchronizing data across the network. Make them all talk to each other directly!
