MEDITECH's Data Repository best practices recommend a dedicated drive for tempdb data files, that the space allocated to this drive be 25-30% of total data space for the SQL Instance, and that the allocated space be split between eight data files and one log file. Is it possible to modify tempdb to meet these standards? Read on to learn how.
It's easy to overlook the system databases in SQL Server, but one in particular is worth paying attention to: tempdb. What does tempdb really do? We know when we create temporary tables or other user objects, they are created in tempdb; however, tempdb is also used for sorting and indexing data, managing cursors and table variables, and other internal query processing operations. (For more detailed information on tempdb, read this from Microsoft.)
One of the most common issues we have with tempdb is disk space usage and allocation. When SQL Server is installed, if we accept the default database and data file values for tempdb, they will often result in too few data files on the wrong drives, resulting in poor overall performance. Fortunately, both MEDITECH and Microsoft provide guidance on optimal tempdb configuration.
How to properly size tempdb is the main consideration. MEDITECH recommends allocating 25-30% of the total server dataspace to tempdb. For example, if our DR data files have 2TB of disk space set aside, we should allocate 500GB for tempdb. Further to this recommendation is that:
- tempdb should be on its own drive
- this space be allocated evenly across 9 files (8 data files, 1 log file)
- size the files to their maximum capacity and disable auto-growth
Very often Data Repository servers are not configured optimally when they are initially set up, including tempdb configuration. Fear not, if your tempdb data files are too few and on the wrong drive, it's easy to correct.
 Let’s do it
This example assumes that you will be moving tempdb to a new, dedicated drive and path. The steps involved will be:
- Create additional data files as needed, as per recommendation above
- Run a script that will define the new location for existing tempdb files
- Stop and restart SQL Server (plan this whole procedure during a normally scheduled maintenance window)
Step 1: add new data files
Create a directory on your new drive to hold the data and log files. Our example follows MEDITECH guidelines of using a T: drive, with a directory name of MEDIFILES. (Your available drive letters may be different, and the folder name is unimportant, so long as the drive is reserved solely for tempdb data files). Next, using SQL Management Studio, create any additional data files on the drive.
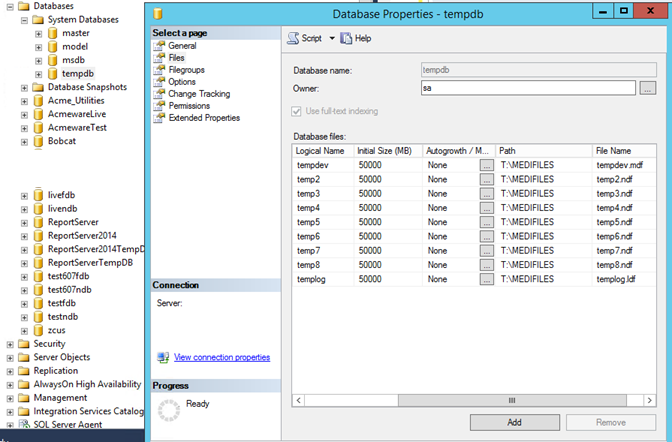
- In the Object Explorer, navigate to Databases > System Databases > tempdb
- Right click tempdb and select Properties
- In the left-hand pane, click Files
- In the right pane there will be at least one data and one log file. Click [Add] at the bottom to add additional files as needed until you have eight data files. The screenshot below assumes nine total files (8 data + 1 log) on a 500GB Drive
- For each NEW file:
- Set the size for the file (drive size / 9) in megabytes
- Set the path and name (e.g, T:\MEDIFILES\temp3.ndf, etc.)
- Disable Autogrowth by clicking the ellipsis (...) button and unchecking "Enable Autogrowth." By setting each file size to its maximum, autogrowth isn't necessary, since you're pre-allocating all the available disk space.
- You will reset the size for existing files after SQL Server has been restarted.
- Click [OK]
Completing this step will verify SQL Server has access to the new drive where you are relocating tempdb.

Step 2: create a script to move existing tempdb files
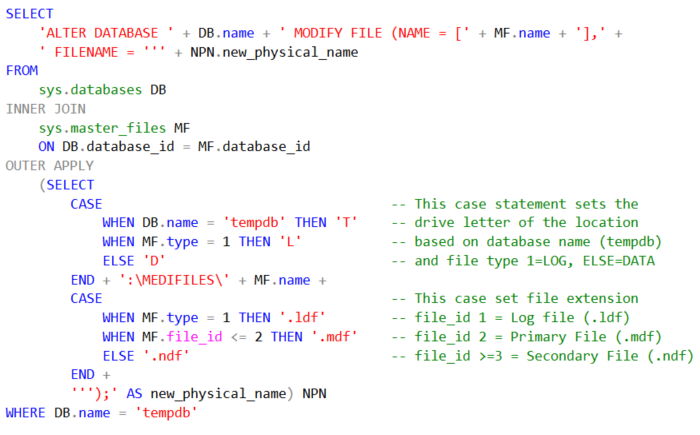
Presuming that the existing tempdb data and log files exist at a non-ideal location (whatever was specified during the initial SQL Server installation), they can't be moved with the GUI. However we can run a nifty SQL script that (with a bit of customization) will pull the necessary references from system tables, and let us produce the necessary TSQL to properly move the files. A screenshot of our script is below; you can download the .sql file when you're ready to try it out. Be sure to modify any literal values from our script with appropriate values for your system (database and directory names, drive letters, etc.)

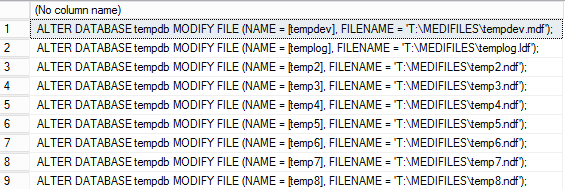
Once you've modified and run the script, it will produce output similar to that below:

Now you can copy and paste rows 1 and 2 into a new query window for review. (Your output will include the files you added in step 1, which of course you don't need to move.) Again, before running these ALTER DATABASE statements, double-check the drive letter, file locations and names, and database names to ensure they're what you want.
ALTER DATABASE tempdb << name of your tempdb database
MODIFY FILE (NAME = [tempdev], << logical file name of your tempdb database
FILENAME = 'T:\MEDIFILES\tempdev.mdf'); << new physical path for data file
When you're ready, execute the ALTER DATABASE statements.
Step 3: restart the SQL instance
Easier said than done, of course! Don't forget to nicely shutdown all the DR transfer background jobs in MIS before restarting SQL Server (a Windows OS reboot is NOT needed). When SQL Server has restarted, go back to Management Studio and review the file properties for tempdb and you should see all your changes. If necessary, modify the size of the original data and log files to match the newly-added ones. Now your tempdb is fully-sized and properly allocated for optimal performance. That’s all folks!
p.s. Props to SQL guru Brent Ozar. He's got a great discussion of tempdb configuration on his website too, and tons of other useful info.

